Showing posts with label Montessori Monday. Show all posts

Monday, May 7, 2012

Even More... From seeds to plants

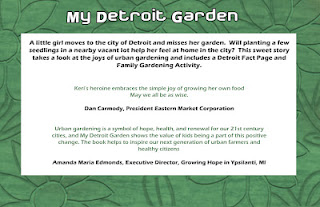
Before I begin my regular blog post, I wanted to share with you about a new children's book one of my former preschool parents has written about gardening in Detroit. I was lucky enough to get to take a sneak peak at it this morning before she even debuts it to the public!  It is a wonderful children's book about a little girl who moves to Detroit and misses her garden at her old home, but finds a way to make a garden right in the city of Detroit!  The authors' name is Keri Middaugh and the title of the book is My Detroit Garden.  Keri has graciously allowed me to use the photo of her book from her blog, My Kitchen My Vice, so that you may see it here:


If you live in the greater Detroit area (specifically Ann Arbor, or Ypsilanti) and you would like to be one of the first to see her new book - and have a chance to buy it - Keri (and her book) will be at Lunasa Open House Market at the Washtenaw Food Hub on Tuesday, May 8th and the Mix Marketplace in downtown Ypsilanti on Saturday, May 12. 

I am also excited that Keri will be visiting my preschool next week to read her new book to both my 3's and 4's class!  She will also be sharing about the process of writing a book and doing a seed planting activity with the kids!  I think the kids will be very excited to meet a real author!

 So, after two weeks of our seeds and plants theme, I am discovering (like I do every year) that I need to start earlier next year so that we can dig deeper (so to speak) into this theme.  After two weeks we still have not learned about the parts of a leaf or the parts of a flower - we have only learned about the parts of a seed, parts of a plant, and parts of a root.  However, I can say that we have had lots of fun and that the kids have really enjoyed learning about seeds and plants!  I guess that is the most important thing!

So, this week for our table project, we made a parts of a plant craft.  We glued on the seed and the roots the first day (the seed to show where all the parts are coming from), the stem and branches the next day, and the leaves and flower the last day.  Below are pictures of this project:

This is my example - we used a bean seed as our seed, yarn for the roots, tongue depressors for the stem, popsicle sticks for the branches, paper cut-outs for the leaves, and a black-line master shape for the flower.
Gluing on the roots
Gluing on the stem and branches
The kids did a really good job with these projects!  Each one looked different, but still had all of the parts of a plant in the correct places!

During the last couple weeks, several of the kids have gone to the art table and drawn or painted pictures of plants.  I am truly amazed at how much they have learned about the parts of a plant!  Here are some pictures of their art work:


Of course, we also had lots of work on the shelves that was related to a seed/plant theme!  Here are some pictures:

Scooping wooden flowers into plastic egg carton.  This work actually has a little story behind it. The wooden flowers were on top of wooden stems which also had leaves on them.  I bought them from The Scrap Box in Ann Arbor, which sells items from manufacturers, etc. that would normally be thrown away.  You can find lots of amazing things there to use for crafts, etc!  Anyways, these wooden flowers (with stem, and leaves) along with some purple wooden flowers were going to be used as a flower arranging work, but the flower tops and leaves would not stay connected to the stem.  So, I just took the tops and made a scooping work instead!
This work is from the KidsSoup member area.  The yellow pieces in the the center of the tray are the centers of flowers.  In each other section of the tray are the petals of the flowers.  You match the shape on the center piece to the shapes on the petal, put the shapes in order from largest to smallest around the center piece, and you have a flower!
This is also from the KidsSoup member area.  The first flower on the page has all it's parts.  But, every other flower is missing a part.  You use the crayons to add the missing part of each flower.
This is from Preschool Creations free garden pack.  There are addition problems using pictures of objects.  I laminated each sheet, added a dry erase marker, and a rag so that each child can do the work and then erase it for another child to use.
This is Sunflower Ketchup Cup Math from Making Learning Fun. 
These are Sunflower One-to-One Correspondence Math cards from Making Learning Fun.


These are word family flowers from the member area of  KidsSoup.  You put a flower on each stem and then find all of the leaves with pictures that rhyme with the picture on each flower.
These are all of the 3-part cards we have out right now - From left to right - recyclables, parts of a seed, parts of a plant, parts of a root.  The parts of a plant and parts of a root cards are free from Montessori Materials.  The parts of a seed cards are free from Montessori Workjobs.  And, the recyclables cards are free from Living Montessori Now.

Sunflower Seed addition from Making Learning Fun
This is not seed/plant related, obviously!  I was so excited to find some of those bath non-skid thingies with the suction cups on the bottom at a Mom 2 Mom sale a while back - for $0.25, I think!  I added some marbles and a small scoop to scoop the marbles onto the suction cups!
Here are some pictures of the kids working:

Sunflower Ketchup Cup Math game
Scooping marbles into suction cups
Somebody got out all of the knobless cylinders at the same time... uh oh!  Fortunately, a friend came a long to help sort them all back into their proper containers!
Hanging Bead Stair
Reading
Sunflower Seed additon
Garden addition with sandpaper numerals to help with writing numbers
Sunflower One-to-one Correspondence math mats
Mystery number
The kids discovered that in one of the books we read there was a hidden number on each page.  Here is a picture of one of the kids (with an assist parent) finding the hidden numbers in the book!
Because of all the seeds we planted last week, we had lots of dirt accidents this week.  In other words, there were containers of dirt all over the classroom with seeds planted in them and a few of them got knocked over.  Oh, and there was the container of mustard seeds that one of the kids opened in order to smell them - we ended up with mustard seeds all over the place that time!  So, I took advantage of the situation and gave a few practical life lessons on sweeping up dirt and seeds with a small broom and dustpan.  Below are a couple pictures of the kids cleaning up their messes:

Ooops!  Luckily baby food jars must be pretty strong, because we had several get knocked down and not one broke.  Of course, this does not help my cause when I am explaining to the kids that when you drop glass in breaks...
Mustard seeds are really difficult to sweep up!  And, even more difficult to pick up off the carpet!
 Living Montessori Now is having yet another amazing giveaway!  This one is for PearlMountian Image Converter Software! Check it out and enter every day to win one of 20 giveaways for this image conversion software!

So, that's it for today!  We are winding down at my preschool - our last day of school is May 18th!  I am still considering different ideas for what to blog about over the summer months.  I will be spending some time at my daughters Montessori school before she is done at the beginning of June, so that is one idea.  But, after that, I'm not sure yet.  I'd like to stay Montessori-focused.  I've thought of blogging about things I am going to add or change for next school year.  But, finding pictures to go along with these posts will take a little more doing since I won't be able to take many of my own without the help of my preschool kids.  We'll see what happens, I guess!  I am open to any ideas that any of my readers have, so leave me a comment if you have ideas about what I can blog about this summer that will be still Montessori-focused!

I am linking up with Living Montessori Now for Montessori Monday!

Montessori Monday

Monday, April 30, 2012

From seeds to plants and everything in between...

Last week we began our unit on seeds and plants -- my all time favorite unit of the whole school year!  I am not yet following the Montessori Botany album, but instead am adapting the way I have taught this unit in the past to a more Montessori style!

I always start this unit off with the study of seeds, since that is where plants come from.  Then, I move on to the parts of a plant, etc.  So, last week was all about seeds - where seeds come from; the parts of a seed; what seeds need to grow, and how seeds grow.  Next week we will begin learning about the parts of a plant.

Books we read this week:

The Tiny Seed by Eric Carle

From Seed to Plant by Gail Gibbons

How a Seed Grows by Helene J. Jordan

First, we learned about where seeds come from.  I made up a tray with 6 different fruits & vegetables on it.  During circle time, I cut each fruit/veggie open so that the kids could see the seeds inside.  We discussed that seeds come from plants and that each of these fruits and veggies grow on some sort of plant.  Unfortunately, I missed taking a picture of the tray of fruits & veggies, but I'm sure you get the basic idea!

I also made a sorting/matching work from the free seed and plant matching cards from Montessori Print Shop.  I added small plastic containers of each kind of seed depicted on the cards.  The child lays out the small containers of seeds in a row at the top of his/her rug, then matches the seed picture cards, and finally matches the corresponding plant picture cards.  Below is a picture of this work:

I also added magnifying glasses so the kids could have a closer look at the seeds.
 After we learned about where seeds come from, we went on to learn about the parts of a seed.  I used the free parts of a seed 3-part cards and "My Parts of a Seed Booklet" from Montessori Workjobs.  I also soaked some lima bean seeds in water overnight so that I could open them up the next day to show the kids the parts of a seed.  Again, I introduced these things during circle time.  Below are pictures of these works:

Parts of a Seed 3-part cards with magnifying glasses and soaked lima beans.  The kids could open up the lima beans to discover the parts of the seed inside!
"My Parts of a Seed Booklet"
One of the kids working on the seed booklet!

As we were learning about where seeds come from and the parts of a seed, we were busy doing the funnest part of all - actually planting seeds!  We planted lots and lots of seeds!  First, we planted grass seed using this fun idea from Mrs. Marcy's Preschool - scroll down her page until you see the silly faces on clear plastic cups.  Yup, that's right, we planted grass seed in clear plastic cups, cut out funny faces, and stuck them to the front of the cups.  Once the grass grows we will have funny faces with "hair!"  Below are pictures of our grass seed projects:


I'll post updated pics once they start growing!

We also planted lima bean seeds in clear baby food jars.  The kids filled the jars with dirt, stuck a finger down the side of the jar to make a hole for the seed (so we could watch the seed grow through the glass), put the seed in the hole, gave them some water, and put the jars on the windowsill.  Below is a really bad picture of the jars by the window.  My phone takes really bag pics when there is a lot of direct sun light.


Next, we planted each of the seeds from the seed sorting work I mentioned earlier in this post - in what else but a fish tank!  This was an extra project for anyone who wanted to participate - and most of the kids wanted to get in on it!  Below is a picture of the fish tank with the seeds planted inside:

From left to right - sunflower seeds, cumin seeds, mustard seeds, pumpkin seed, poppy seeds, sesame seeds,  flax seeds, and fennel seeds - I put a label with the same of each seed above where it was planted.

But, we didn't stop there!  The kids were so excited about planting seeds in the fish tank that I brought out all of the kinds of bean seeds that I have and we planted each of those as well - on the other side of the fish tank!  Below is a picture of the bean seeds planted in the fish tank:

From left to right - lima bean, black eyed pea, kidney bean, black bean, pinto bean, great northern bean - again, I labeled each one.
 The last thing we planted were basil seeds.  We planted these using peat pots and peat pellets instead of potting soil.  The kids liked watching the peat pellets expand with water!  Below is a picture of one of the kids planting the basil seeds:


The 3's class kids also did an additional project involving 20 night crawlers - yes, I mean those big worms used for fishing!  We made a worm farm using a giant glass jar, potting soil, sand, and gavel.  First, I put in a layer of gravel on the bottom of the jar.  Then, the kids scooped in soil and sand in alternating layers. I then covered the jar with construction paper to block out the light so the worms would come right to the edge of the jar to make their trails in the dirt.  I can't believe I didn't take a picture of the worm farm before I covered it with paper to block out the light, but I didn't.  I guess it's easy to miss stuff like that when you are in the middle of a bunch of excited kids!  Finally, we added all 20 worms to the top of the jar.  Below are some pics that I did manage to get during the process:

Picking up the squirmy worms to put in the jar!
Look at that pile of worms!
The finished product!

Waiting for those worms to dig their way down!  It actually took them almost 24 hours to all go down into the dirt.  And, yes, I was worried when I left school that they might escape and be squirming all over the classroom the next morning!  But, they were not!

 Well, that's it for today!  I will post more later this week about our seeds and plants unit.  For more fun ideas for your classroom, please check out my Lesson Plans to Pots and Pans Facebook page!

I am linking up with Montessori Monday via Living Montessori Now!


Montessori Monday

Monday, April 23, 2012

Earth Day: Part 1

With Earth Day this past Sunday, our main focus last week was on tangible ways we can all help take care of our planet every day, not just on Earth Day.  So, similar to what I have done in previous years, I brought out my reusable grocery bag containing everyday items we use and more earth-friendly alternatives.  I wish I had thought to take a picture of this bag of goodies, but I did not.

Here is a list of what was inside:
* plastic baggie (ziploc type)... reusable plastic container
* paper lunch bag... reusable lunch box
* roll of paper towels... cloth dish towel
* plastic water bottle... reusable water bottle
* plastic grocery bag... reusable grocery bag
* traditional light bulb... florescent light bulb

After I presented each set of items, I reminded the kids about what happens to garbage that we throw away in a garbage can.  In other words:
1) throw garbage in the garbage can
2) bring garbage can to the curb
3) garbage truck picks up garbage
4) garbage truck brings garbage to the garbage dump (pointing out that a garbage dump is on the earth)
5) garbage at the dump makes our earth dirty

Of course, the light bulbs were the one exception to all of the other items.  In this case I explained to the kids that traditional light bulbs use lots of electricity.  That electricity is made mainly from burning coal.  And that burning coal puts lots of yucky stuff into the air we breath and makes our earth dirty.  On the other hand, the florescent bulb uses much less electricity - which uses less coal and therefore does not make the air we breath and our earth as dirty as the traditional light bulb.  And, as an added bonus, since florescent bulbs use less electricity, they also cost less to use!

In addition to our discussions of tangible ways we can help keep our earth clean, we also had some really cool earth-friendly projects!  In the 4's class we made earth crayons out of old blue & green crayons.  And, in the 3's class we made cookie cutter shapes out of recycled paper from a paper shredder and coffee filter earths.

4's Class: Recycled Earth Crayons:

First, the kids sorted out all of the green and blue crayons from the box of old crayons we had in the classroom.  I set this up as a work for whoever wanted to participate.
Then, we soaked the crayons in water and peeled off the paper wrappers.  We started this work inside, but the kids were so into it we brought it outside during our play time!
Next, the kids broke the crayons into small pieces and put them into a small muffin tin.
Here are the crayons in the muffin tin.
Then we put the muffin tin in my toaster oven at 250 degrees for about 20 minutes - we do not have access to an oven at our school...
Here are a few of the kids watching the crayons melt in the toaster oven!
Here are some of the finished Recycled Earth Crayons!  I think they turned out pretty neat!

3's Class Recycled Paper Cookie Cutter Shapes:

We started with some shredded paper that my mom gave me from her office at work and soaked it in water.  I made a flour and water paste, split the paste into four equal parts, added a different color food coloring (because the paper was almost all white) to each bowl of paste, and then mixed the paste with the wet, shredded paper. 

The kids chose a cookie cutter shape and a color of the shredded paper and paste mixture.  Then they pressed the shredded paper and paste mixture into the cookie cuter shape, removed the cookie cutter, and let the shape dry for a couple days on a piece of wax paper.
Here are some of the finished Recycled Paper Cookie Cutter Shapes!  Pretty cute, huh!
Well, that's it for today!  Keep an eye out for more posts this week about our Earth Day fun!  And, for more great ideas, check out my Facebook page, also called Lesson Pans to Pots and Pans!

I'm linking up with Montessori Monday via Living Montessori Now!

Montessori Monday